scripts
pnpm install
安装项目模块依赖,此时会触发npm钩子,会运行npm run prepare。
pnpm run prepare
初始化项目,效果如下图
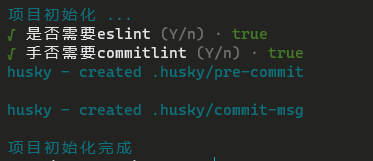
根据提示选择是否需要
lint和提交规范
实现逻辑如下代码:
点击查看详情
const { prompt } = require('enquirer')
const chalk = require('chalk')
const { funExec } = require('./utils')

async function init() {
    const arr = ['pnpm', 'yarn', 'npm']
    let name = null

    for (let i = 0; i < arr.length; i++) {
        name = await funExec(`${arr[i]} --version`)

        if (name) {
            name = arr[i]
            break
        }
    }

    // 没有包管理工具
    if (!name) throw new Error('请安装包管理工具')

    const git = await funExec('git init')

    // 没有git
    if (!git) throw new Error('请你使用git办理管理工具')

    // 处理husky
    const husky = await funExec('npx husky install')

    // 命令失败
    if (!husky) throw new Error('npx husky install error')

    console.clear()
    console.log(chalk.cyan('项目初始化 ...'))

    const answer = await prompt([
        {
            type: 'confirm',
            name: 'q1',
            message: '是否需要lint',
            initial: true
        },
        {
            type: 'confirm',
            name: 'q2',
            message: '手否需要commitlint',
            initial: true
        }
    ]).catch(() => {
        throw new Error('出错了')
    })

    if (!answer) {
        throw new Error('出错了')
    }

    let npm = `${name} run precommit`
    if (answer.q1) npm += `&& ${name} run lint`

    if (npm) {
        const d = await funExec(`npx husky add .husky/pre-commit "${npm}"`)
        if (d) console.log(chalk.cyan(d))
    }

    if (answer.q2) {
        const d = await funExec('npx husky add .husky/commit-msg "npx --no-install commitlint --edit "$1""')
        if (d) console.log(chalk.cyan(d))
    }

    console.log(chalk.cyan('项目初始化完成'))
}
你可以根据自己业务需要修改逻辑代码
- 代码提交规范,看如下代码(git钩子实现)
点击查看详情
module.exports = {
    extends: ['@commitlint/config-conventional'],
    rules: {
        'type-enum': [
            2,
            'always',
            [
                'feat', // 新特性
                'improvement', // 加强现有特性
                'fix', // 修补bug
                'refactor', // 重构
                'docs', // 文档
                'test', // 单元测试
                'config', // 配置文件
                'style', // 格式需改
                'perf', // 性能提升
                'ci', // ci 主要目的是修改项目继续集成流程(例如 Travis,Jenkins,GitLab CI,Circle等)的提交
                'revert', // 版本回退
                'chore', // 其他修改
                'scope' // commit 影响的范围(选填), 比如: route, component, utils, build
            ]
        ],
        'type-empty': [2, 'never'], // type不能为空
        'type-case': [0, 'always', 'lower-case'], // type不限制大小写
        'subject-empty': [2, 'never'], // subject(简短得描述)不能为空
        'subject-max-length': [1, 'always', 50], // subject最大长度,超出只会警告,不阻止提交
        'body-leading-blank': [1, 'always'],
        'footer-leading-blank': [1, 'always'],
        'header-max-length': [2, 'always', 72]
    }
}
- 示例
git commit -m 'docs: 说明文档'
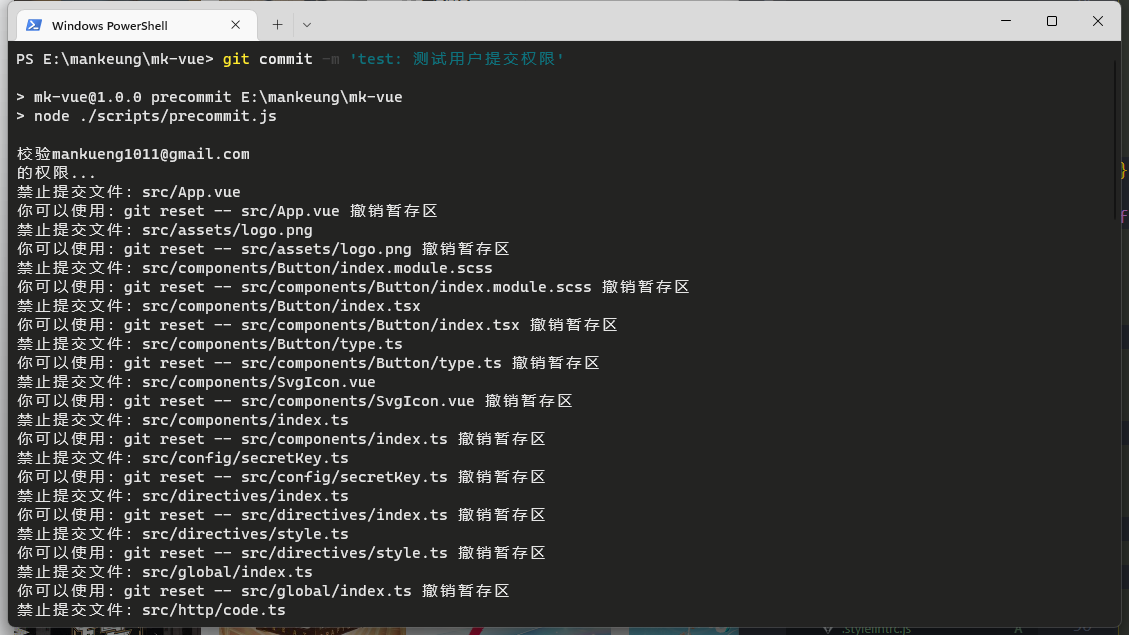
代码提交权限逻辑如下代码
注意
本项目中默认要权限验证,如不需要看下方取消方法。
点击查看详情
const { funExec } = require('./utils')
const chalk = require('chalk')

async function init() {
    const child = await funExec('git diff --cached --name-only')

    if (!child) {
        console.log(chalk.red('没有待提交内容'))
        process.exit(1)
    }

    const disSubmitFiles = await inExcludeFile(child.trim().split('\n'))

    if (disSubmitFiles.length) {
        disSubmitFiles.forEach(file => {
            console.log(`${chalk.red('禁止提交文件:')}${chalk.green(file)}`)
            console.log(`${chalk.red('你可以使用:')}${chalk.green(`git reset -- ${file}`)} ${chalk.red('撤销暂存区')}`)
        })
        process.exit(1)
    } else {
        console.log(chalk.green('用户权限校验完成'))
    }
}

function inExcludeFile(files) {
    return new Promise(async resolve => {
        // 获取用户
        let userEmail = await funExec('git config --get user.email')
        userEmail = userEmail.replaceAll('\n', '')
        console.log(chalk.green(`校验${userEmail}的权限...`))

        setTimeout(() => {
            // 请求服务器拉取当前用户可操作目录文件(src下根文件哦!)
            const allowPaths = userEmail === 'mankueng1011@gmail.com' ? [] : ['pages'] // 这里写死

            let disSubmitFiles = Array.from(new Set(files.map(item => {
                const arr = item.split('/')
                const isSrc = arr[0] === 'src'

                if (isSrc) return item

                return null
            }))).filter(file => file)

            if (!allowPaths.length) return resolve([])

            disSubmitFiles.forEach((file, i) => {
                allowPaths.some(allowPath => {
                    const reg = new RegExp(`^src/${allowPath}`, 'i')

                    if (reg.test(file)) {
                        disSubmitFiles[i] = null
                        return true
                    }

                    return false
                })

                disSubmitFiles = disSubmitFiles.filter(file => !!file)
                resolve(disSubmitFiles)
            })
        }, 300)
    })
}
上面代码33你可以发请求到后端拿去用户权限,逻辑可以根据自己业务修改,此处只做简单处理。
- 示例如下图
不需要代码提交权限校验
- 去掉
/scripts/prepare.js下代码如下:
- let npm = `${name} run precommit` // 56
+ let npm = ''
- if (answer.q1) npm += `&& ${name} run lint` // 57
+ if (answer.q1) npm += `${name} run lint`
- 去掉
package.json里的scripts
- "precommit": "node ./scripts/precommit.js",
- 运行
pnpm install
pnpm dev
启动项目开发模式
- 开发环境配置如下代码:
点击查看详情
# 环境
VITE_APP_ENV = "dev"

# 页面标题
VITE_APP_TITLE = "Vue + TypeScript + Vite + ... 模板框架"

# 接口请求地址
VITE_APP_API_ROOT = "/"

# websocket
VITE_APP_API_SOCKET = "/"

# 调试工具,可设置 eruda 或 vconsole,如果不需要开启则留空
VITE_APP_DEBUG_TOOL = "eruda"

# mock
VITE_APP_MOCK = "ON"

# 是否开启代理
VITE_APP_PROXY = "ON"

# 是否开启cdn
VITE_APP_CDN = "ON"
- 例子:
console.log(import.meta.env.VITE_APP_ENV) // 'dev'
可以根据自己业务需要添加配置
pnpm build:test
测试环境打包
- 测试环境配置如下代码:
点击查看详情
# 环境
VITE_APP_ENV = "test"

# 页面标题
VITE_APP_TITLE = "Vue + TypeScript + Vite + ... 模板框架"

# 接口请求地址
VITE_APP_API_ROOT = "/"

# websocket
VITE_APP_API_SOCKET = "/"

# 调试工具,可设置 eruda 或 vconsole,如果不需要开启则留空
VITE_APP_DEBUG_TOOL =

# mock
VITE_APP_MOCK = "OFF"

# 是否开启cdn
VITE_APP_CDN = "OFF"

# 是否开启代理
VITE_APP_PROXY = "OFF"

# sourcemap
VITE_BUILD_SOURCEMAP = "ON"

# compress
VITE_APP_COMPRESS =
pnpm build
生产环境打包
- 生产环境配置如下代码:
点击查看详情
# 环境
VITE_APP_ENV = "prod"

# 页面标题
VITE_APP_TITLE = "Vue + TypeScript + Vite + ... 模板框架"

# 接口请求地址
VITE_APP_API_ROOT = "/"

# websocket
VITE_APP_API_SOCKET = "/"

# 调试工具,可设置 eruda 或 vconsole,如果不需要开启则留空
VITE_APP_DEBUG_TOOL =

# mock
VITE_APP_MOCK = "OFF"

# 是否开启代理
VITE_APP_PROXY = "OFF"

# 是否开启cdn
VITE_APP_CDN = "ON"

# 删除console
VITE_APP_DROP_CONSOLE = "ON"

# compress
# 是否在打包时开启压缩,支持 gzip 和 brotli
VITE_APP_COMPRESS = "gzip,brotli"
pnpm preview
预览打包项目
代码规范
# eslint
pnpm lint:eslint
# 格式规范
pnpm lint:prettier
pnpm prettier
# 样式规范
pnpm lint:style
pnpm lint
代码规范校验
pnpm prepare
安装依赖npm钩子
pnpm precommit
提交权限规范
pnpm war
打包./dist为war包
- 逻辑代码如下:
点击查看详情
const zipFolder = require('folder-zip-sync')
const pkg = require('../package.json')

try {
    zipFolder('./dist', `./dist/${pkg.warName}.war`)
} catch (error) {
    throw new Error('压缩文件出错了')
}
war包名字看
packages.json,warName默认为vite,可以自定义。
pnpm new
新建模板,具体实现请看plopfile.js与模板文件/templates/**。
效果如下图:

VuePress
pnpm docs:dev
文档开发模式
pnpm docs:build
文档打包
去掉文档
- 删除
docs文件目录 package.json去掉依赖如下:
- @vuepress/plugin-register-components
- @vuepress/plugin-search
- vuepress
- vuepress-plugin-copy-code2